Running BMTK on the Neuroscience Gateway (NSG)#
The Neuroscience Gateway (NSG) is an NSF funded project that provides HPC resources for neuroscientists. It provides access to extensive CPU, GPU, and Memory resources that may not always be available locally. But just as important, NSG includes a wide variety of pre-installed computational neuroscience software that can be used for everything from modeling, data analysis, and even AI and ML applications. For modeling and simulation not only does NSG include BMTK, but also other population tools like NEURON, NEST, Brian, PyNN, NetPyNE, among others. See https://nsgprod.sdsc.edu:8443/portal2/tools.action for a list of available software.
The Neuroscience Gateway can be accessed in two different ways, either through the Web Portal interface or through the REST API. The focus in this tutorial will be on using the Web Portal.
Using NSG Through the Web Portal#
Example: Using NSG to run Large Scale PointNet (NEST) Simulations#
In this tutorial we will show how to BMTK simulations on NSG using an existing Mouse V1 Layer 4 Model example network and use it to run simulations of the Expanse computing cluster. The same instructions will be applicable for different types of simulations (including FilterNet, and Network Builder), although the names and location will need to be updated accordingly.
For Running BioNet simulations with NEURON there are some extra steps as described in BioNet Example
Step 1: (Register and) Log-in#
If you are planning to use NSG for your research you will first need to register an account at https://www.nsgportal.org/gest/reg.php. It is freely available to most researchers, educators, and students working in the neuroscience field.
After you have registered go ahead and log in to the NSG Portal
Step 2: Packaging the environment files#
We will need to package all necessary files into a .zip folder to be uploaded to NSG. This will include the configuration files, network files, components, inputs, and any other necessary files to execute your BMTK simulation run script.
In our example if we have all files stored in Ch6_l4model then we could use the following command in a terminal:
$ cd ../ && zip -rq l4model.zip Ch6_l4model/
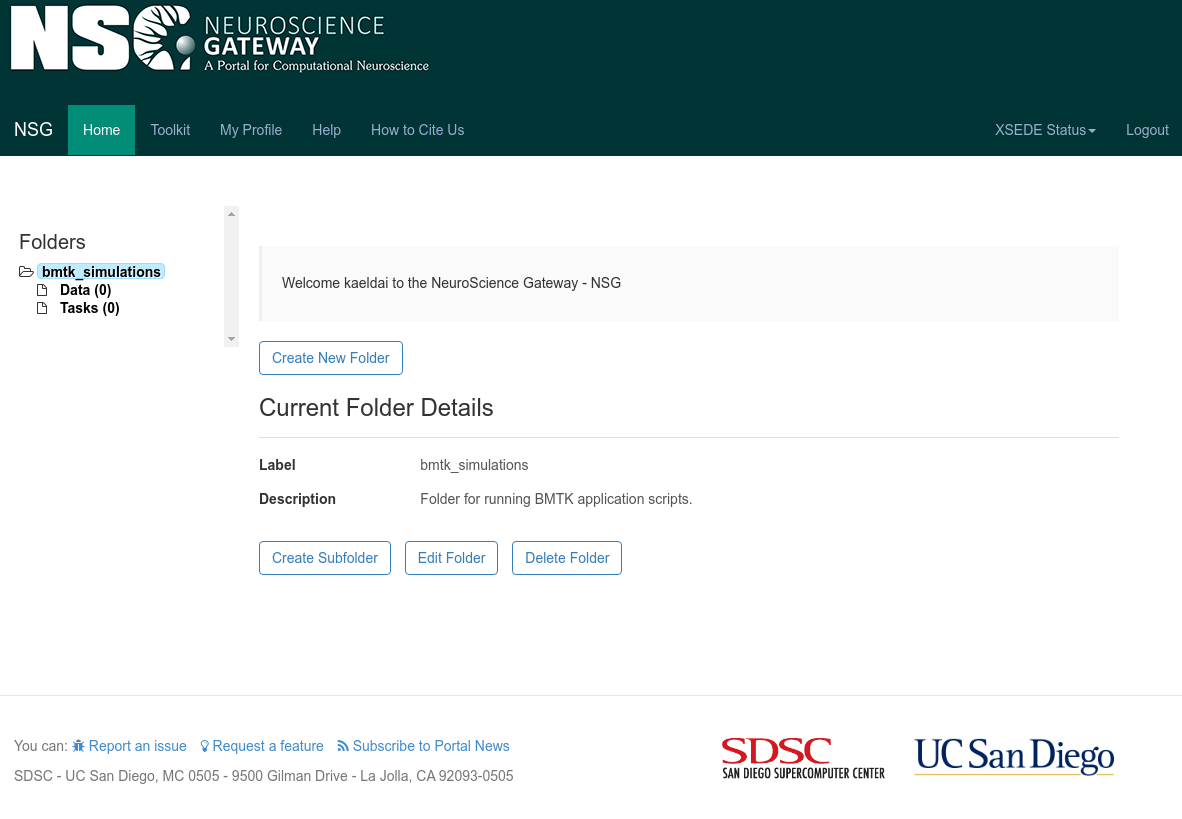
Step 3: Setting Up an NSG Folder#
1. When you login you will be prompted to Create New Folder that can be used for running BMTK applications. Click on
that button, we will give it a “Label” of bmtk_simulations and an appropriate description:
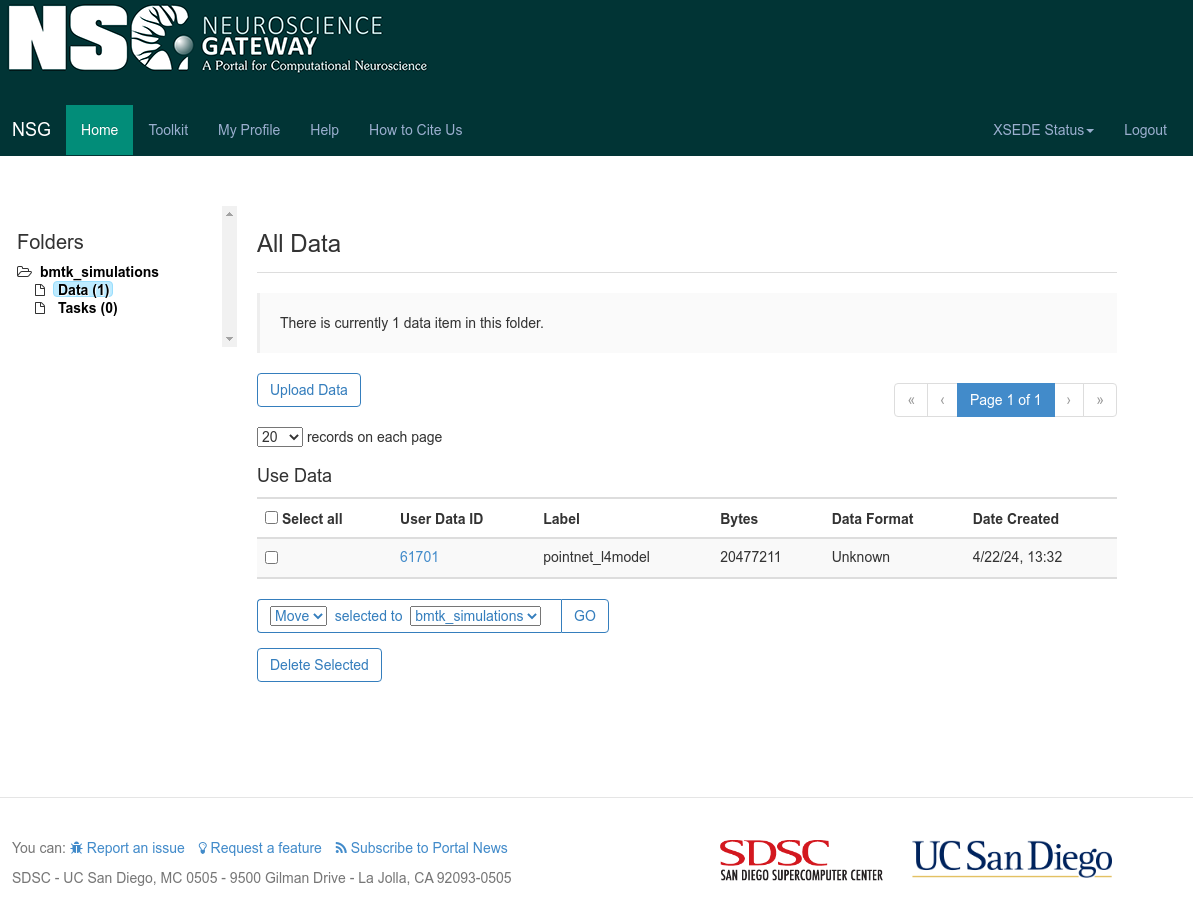
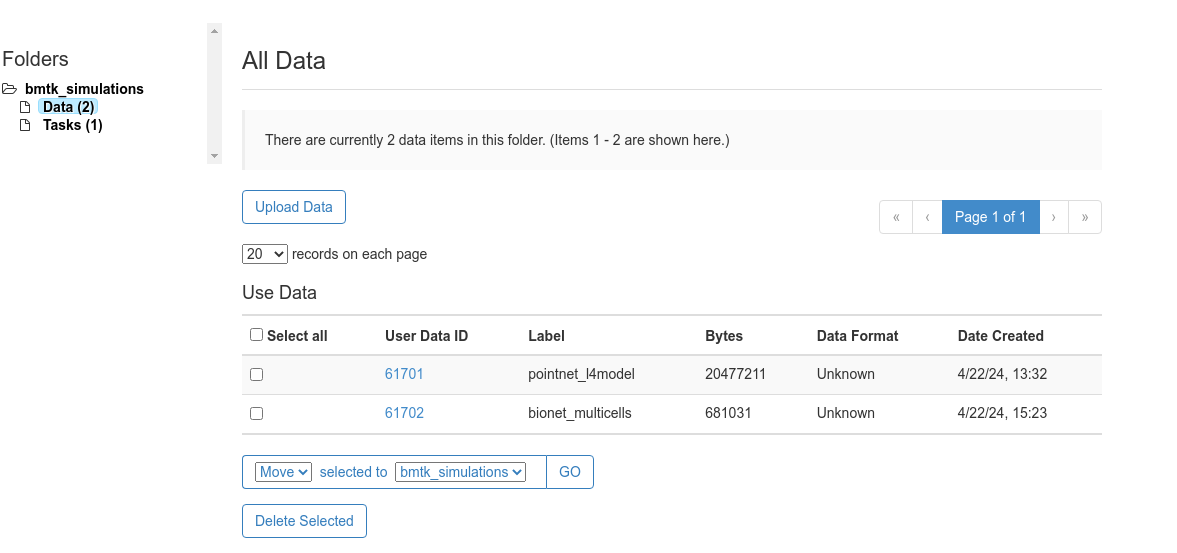
2. Navigate to bmtk_simulations > Data and select the Upload Data button. Provide an appropriate label (we’ll
use Label pointnet_l4model) and click the Choose File button to upload the previously created zip file. Click
Save to upload the file.
Step 4: Setup and Run Task#
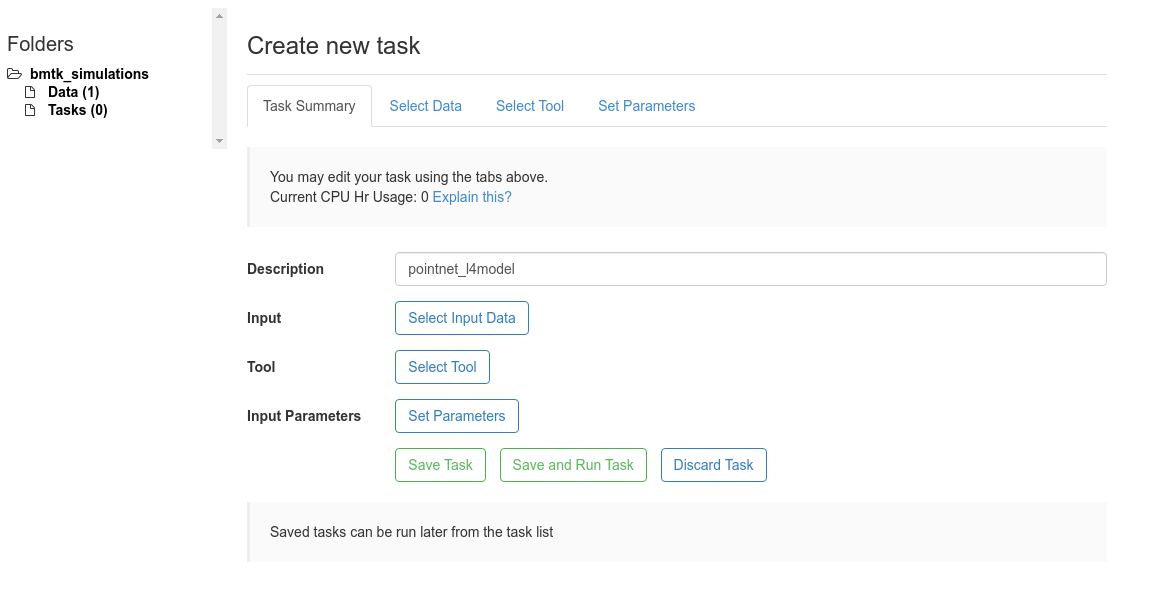
Navigate to the bmtk_simulations > Tasks folder and select
Create New Taskbutton.First give a Description for the task - we’ll call it pointnet_l4model
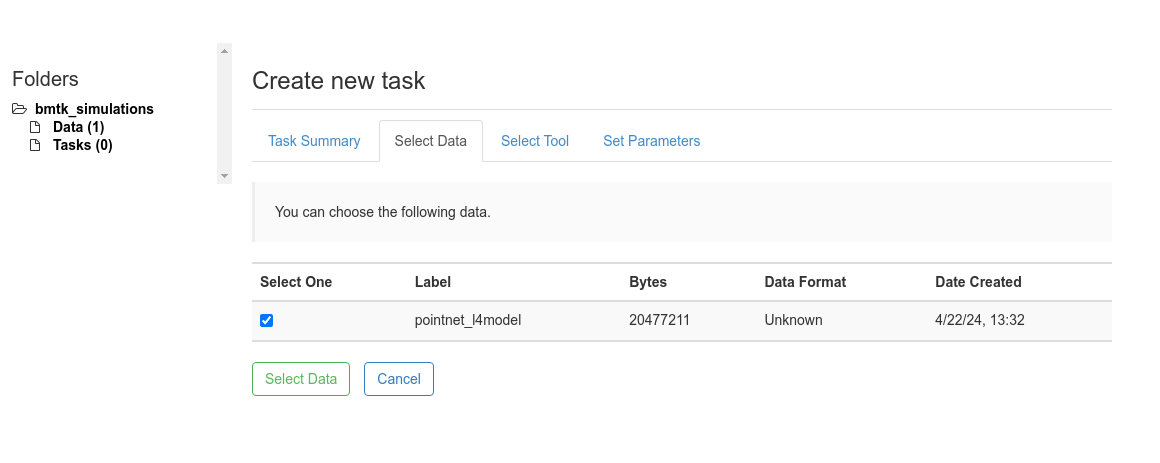
3. Under the Select Data panel choose the uploaded zip file for with the pointent_l4model Label and click
Select Data
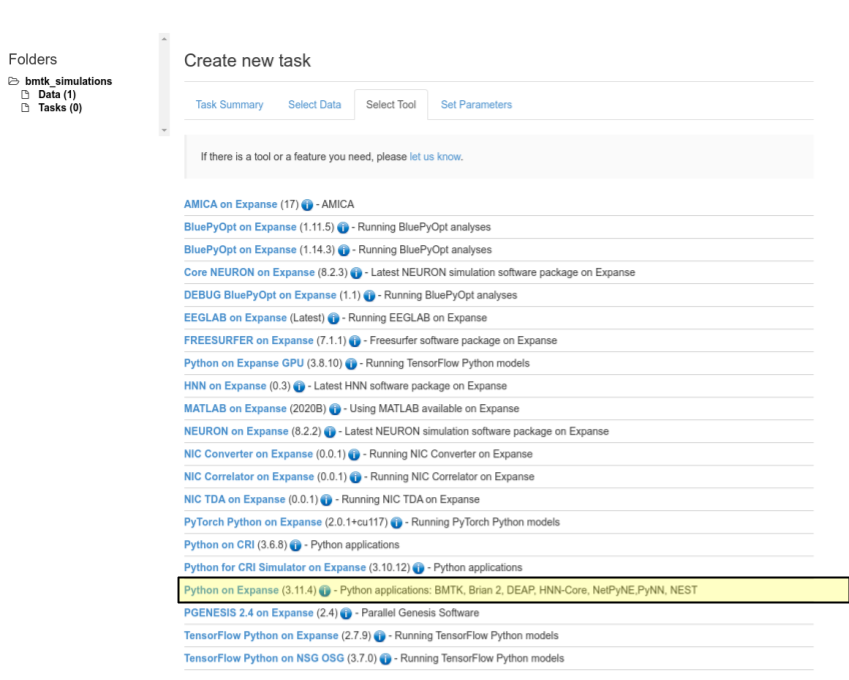
Under the
Select Toolpanel we select the Python on Expanse option
Finally Select the Set Parameters Panel to give the run-time parameters. Enter the parameters as specified below and click the
Save Parametersbutton.

Set Max Hours to Run: 1.0 - Depending on the size of the network, the tstop and dt, and the number of cores we may have to increase/decrease this value.
Unselect Do you require nrnivmodl compilation - flag only applies to NEURON (eg. BioNet) applications.
Set Enter Main Input Python Filename: run_pointnet.py - Entry python script to run.
Set Enter sub-directory name: Ch6_l4model - This is required since the way we zipped up our data everything is under the Ch6_l4model/ folder.
To speed up the simulation we will run it parallelized using MPI with 8 processes.
Set Enter Number of Nodes: 1 - Since we are significantly less than the available cores/memory per node we can benefit from keeping all MPI Tasks on the same node.
Set Enter Number of MPI Tasks per Node: 8 and Enter Number of Cores per Node: 8
Set Enter Number of GB Memory per Node: 16
Notes: Building the Network and LGN Inputs
Running the run_pointnet.py script requires that the SONATA network files (network/) and lgn inputs (inputs/spikes.gratings.90deg_4Hz.h5) already exists. If they don’t, or you want to re-generate them, you can replace the Enter Main Input Python Filename: option with the build_network.py or run_filternet.py scripts.
6. Now that you have selected the data, the tool, and the parameters click the Save and Run Task button to submit
the task to the HPC.
Example 2: Using NSG for BioNet (eg. NEURON) Simulations#
The above tutorial will work when running PointNet, FilterNet, Builder, or Analysis components of BMTK. However running BioNet simulations require a slight changes to initialize a task properly since it requires using the NEURON simulation underneath. In this example we will show a how to run a multi-core BioNet simulation using the network generated in Chapter 3 of the BMTK tutorial taking note to highlight difference from the example above.
Step 1: Packaging Data#
We first want to package the Ch3_mutlicells/ folder into a single zip file so it will contain the python scripts and all necessary network and model files to run the full simulation. HOWEVER The modfiles stored in the components/mechanisms/modfiles/ folder need to be moved to the root directory. NSG will need to compile these files before running the simulation and if they are stored under the components/ sub-directory they will not be found.
$ cp -r ../Ch3_multicells .
$ mv Ch3_multicells/components/mechanisms/modfiles/* Ch3_multicells/
$ zip -rq bionet_multicells.zip Ch3_multicells/
Step 2: Uploading the Data#
Log into NSGPortal and either select
Create New Folder, or select the existing bmtk_simulations folder if it exists.Under bmtk_simulations > Data folder select Upload Data to upload the created bionet_multicells.zip folder with an descriptive Label
Step 3: Creating and Submitting a Task#
Under bmtk_simulations > Tasks select the Create New Task button
In the Task Summary tab give the task an appropriate description (we’ll call it bionet_multicells)
In the
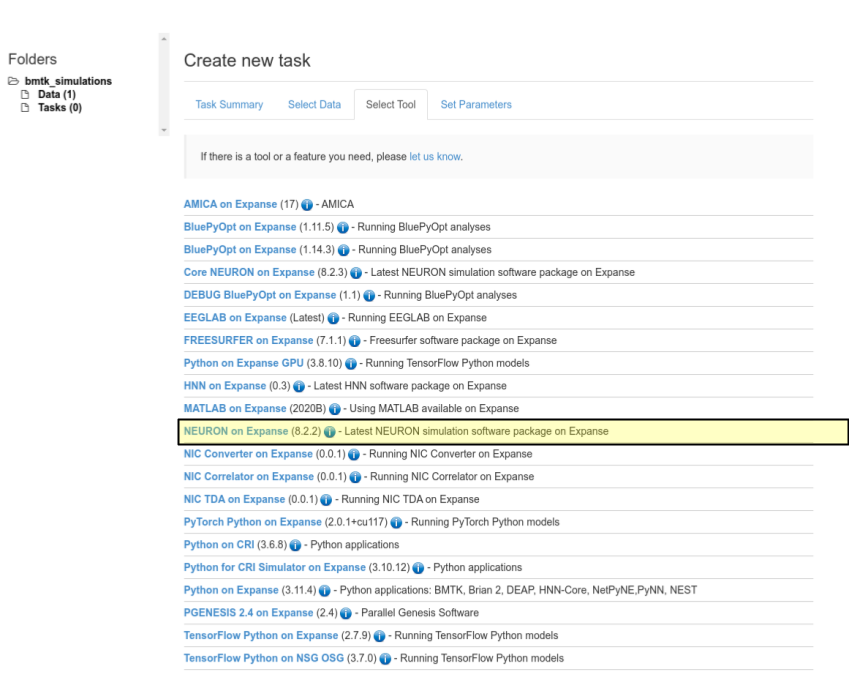
Select Datatab make sure to select the bionet_multicell data we uploaded in the previous step and clickSelect Data.In the
Select Tooltab choose option NEURON on Expanse
In the Set Parameters tab we can use the following setup, the click Save Parameters button.
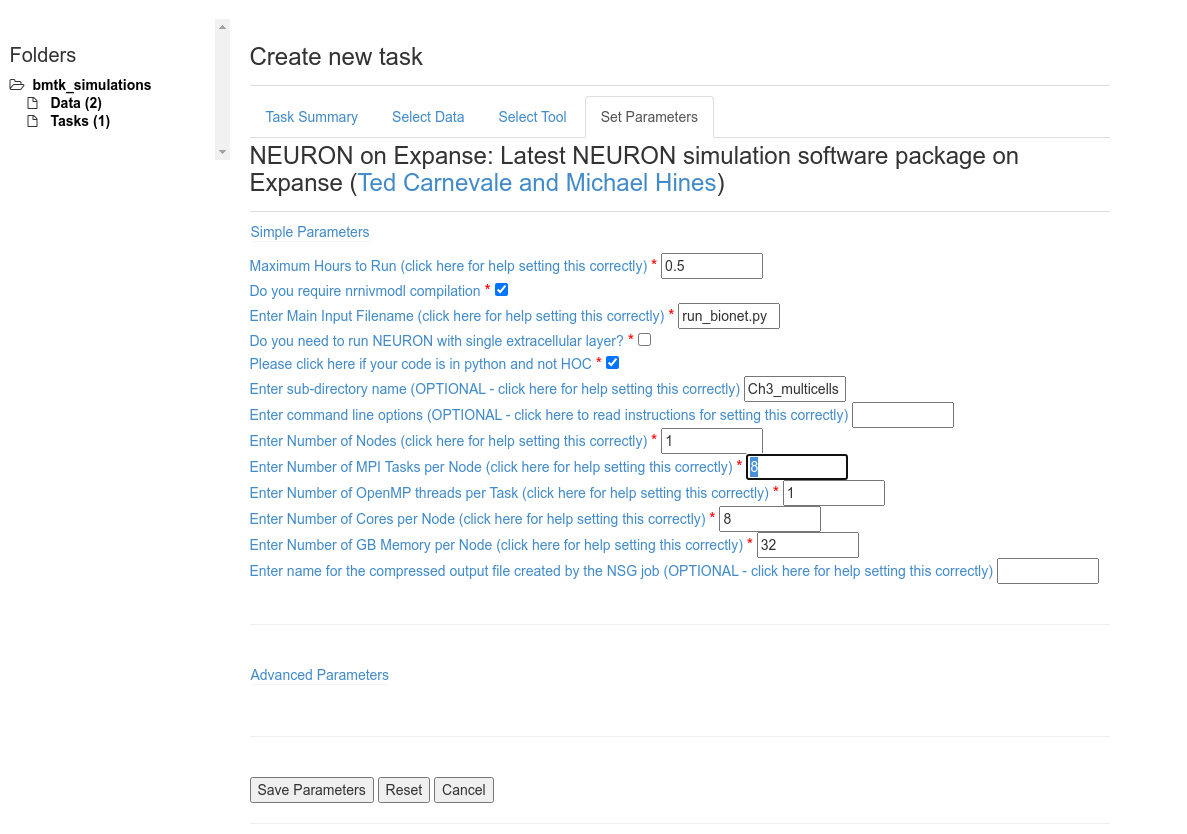
The following parameters are important
Make sure the select Do you required nrnivmodl compilation in order to compile the .mod file necessary to run the models
Set Enter Main Input Filename: run_bionet.py as this is the script to execute the BMTK simulation
Make sure to select Please click here if your code is in python and not HOC
Due to the structure of the zip file we need to set Enter sub-directory name: Ch3_mutlicells
Other settings that can be adjusted:
For a modest network Maximum Hours to Run: 0.5 is plenty enough. But for longer simulations or larger networks you may need to increase this value otherwise the job will stop before BMTK has finished.
We will set Number of MPI Tasks per Node and Number of Cores per Node to 8, and Number of Nodes to 1 to parallelize the simulation on 8 cores.
For current network Number of GB Memory per Node: 32 will suffice.
Finally select
Save and Run Taskto submit the Task to the queue.